Archive | Students RSS feed for this section

Cryptography Challenge – Collision (Medium): National Cyber League (NCL) 2015 Postseason

Oh, so you want a program “that find strings that have ‘nice’ digests.”

Fun fact, I had to go through 9,540,244,837 hashes to find the sha256! Editing the perl script [1] allowed for solving md5, sha1 and sha256. See the write up below regarding the question, answer, and solution code. For other National Cyber League content see Categories: NCL – Enjoy

Question 1:
What is an input that will yield an md5 hash that starts with D391B?

Answer 1:
“@^

echo -n '"@^' | md5sum | awk '{print toupper($0)}'
D3917551061C099469F49F4F4F1D4324  -

Solution 1:

#!/usr/bin/env perl

package Words;

sub new {
    my $class = shift;
    my $self = bless {}, $class;
    $self->{ 'next' } = [ 32 ];
    return $self;
}

sub next {
    my $self = shift;
    $self->increment();
    return pack( 'C*', @{ $self->{ 'next' } } );
}

sub increment {
    my $self = shift;
    my $N    = $self->{ 'next' };
    $N->[ -1 ]++;

    for ( my $i = $#{ $N } ; $i ; $i-- ) {
        return if $N->[ $i ] < 127;
        $N->[ $i ] = 33;
        $N->[ $i - 1 ]++;
    }

    if ( $N->[ 0 ] == 127 ) {
        $N->[ 0 ] = 33;
        unshift @{ $N }, 33;
    }
}

package main;

use Digest::MD5 qw( md5_hex );
use Time::HiRes qw( time );

$SIG{ INT } = sub { exit };

my $generator = Words->new();

#my $vanity   = '314159265358979323';
my $vanity = 'd391b';
my $search   = 4;
my $look_for = substr( $vanity, 0, $search );

my $print_speed = 1000000;
my $start_time  = time();

my $i = 0;
my $j = 0;
while ( 1 ) {
    my $word   = $generator->next();
    my $digest = md5_hex( $word );
    $i++;
    $j++;
    if ( $j == $print_speed ) {
        my $new_time = time();
        printf "%d hashes in %.3fs\n", $print_speed, $new_time - $start_time;
        $start_time = $new_time;
        $j          = 0;
    }
    next unless $look_for eq substr( $digest, 0, $search );
    printf "%10d : %-20s : %-10s : %s\n", $i, $word, $look_for, $digest;
    $search += 1;
    last if $search == length( $vanity );
    $look_for = substr( $vanity, 0, $search );
}

FILE: find.vanity.NCL-2015-Postseason.tar.gz


Question 2:
What is an input that will yield an sha1 hash that starts with 45EECA8?

Answer 2:
!Zxu’

echo -n '!'"Zxu'" | sha1sum | awk '{print toupper($0)}'
45EECA8E9BFCA37E76B30B8E873DC4527062508B  -

Solution 2:

#!/usr/bin/env perl

package Words;

sub new {
    my $class = shift;
    my $self = bless {}, $class;
    $self->{ 'next' } = [ 32 ];
    return $self;
}

sub next {
    my $self = shift;
    $self->increment();
    return pack( 'C*', @{ $self->{ 'next' } } );
}

sub increment {
    my $self = shift;
    my $N    = $self->{ 'next' };
    $N->[ -1 ]++;

    for ( my $i = $#{ $N } ; $i ; $i-- ) {
        return if $N->[ $i ] < 127;
        $N->[ $i ] = 33;
        $N->[ $i - 1 ]++;
    }

    if ( $N->[ 0 ] == 127 ) {
        $N->[ 0 ] = 33;
        unshift @{ $N }, 33;
    }
}

package main;

use Digest::SHA qw( sha1_hex );
use Time::HiRes qw( time );

$SIG{ INT } = sub { exit };

my $generator = Words->new();

#my $vanity   = '314159265358979323';
my $vanity = '45eeca8';
my $search   = 7;
my $look_for = substr( $vanity, 0, $search );

my $print_speed = 1000000;
my $start_time  = time();

my $i = 0;
my $j = 0;
while ( 1 ) {
    my $word   = $generator->next();
    my $digest = sha1_hex( $word );
    $i++;
    $j++;
    if ( $j == $print_speed ) {
        my $new_time = time();
        printf "%d hashes in %.3fs\n", $print_speed, $new_time - $start_time;
        $start_time = $new_time;
        $j          = 0;
    }
    next unless $look_for eq substr( $digest, 0, $search );
    printf "%10d : %-20s : %-10s : %s\n", $i, $word, $look_for, $digest;
    $search += 1;
    last if $search == length( $vanity );
    $look_for = substr( $vanity, 0, $search );
}

FILE: find.vanity.NCL-2015-Postseason.tar.gz


Question 3:
What is an input that will yield an sha256 hash that starts with 542715A3?

Answer 3:
!<21hA

echo -n '!<21hA' | sha256sum | awk '{print toupper($0)}'
542715A3959F733B0C9B63DEAE2C98B08F522720118D20D541FA1B6C81C2B118  -

Solution 3:

#!/usr/bin/env perl

package Words;

sub new {
    my $class = shift;
    my $self = bless {}, $class;
    $self->{ 'next' } = [ 32 ];
    return $self;
}

sub next {
    my $self = shift;
    $self->increment();
    return pack( 'C*', @{ $self->{ 'next' } } );
}

sub increment {
    my $self = shift;
    my $N    = $self->{ 'next' };
    $N->[ -1 ]++;

    for ( my $i = $#{ $N } ; $i ; $i-- ) {
        return if $N->[ $i ] < 127;
        $N->[ $i ] = 33;
        $N->[ $i - 1 ]++;
    }

    if ( $N->[ 0 ] == 127 ) {
        $N->[ 0 ] = 33;
        unshift @{ $N }, 33;
    }
}

package main;

use Digest::SHA qw( sha256_hex );
use Time::HiRes qw( time );

$SIG{ INT } = sub { exit };

my $generator = Words->new();

#my $vanity   = '314159265358979323';
my $vanity = '542715a3';
my $search   = 8;
my $look_for = substr( $vanity, 0, $search );

my $print_speed = 1000000;
my $start_time  = time();

my $i = 0;
my $j = 0;
while ( 1 ) {
    my $word   = $generator->next();
    my $digest = sha256_hex( $word );
    $i++;
    $j++;
    if ( $j == $print_speed ) {
        my $new_time = time();
        printf "%d hashes in %.3fs\n", $print_speed, $new_time - $start_time;
        $start_time = $new_time;
        $j          = 0;
    }
    next unless $look_for eq substr( $digest, 0, $search );
    printf "%10d : %-20s : %-10s : %s\n", $i, $word, $look_for, $digest;
    $search += 1;
    last if $search == length( $vanity );
    $look_for = substr( $vanity, 0, $search );
}

FILE: find.vanity.NCL-2015-Postseason.tar.gz
Reference:

[1] https://github.com/depesz/vanity-hash-finder/blob/master/find.vanity.md5.by.rhodiumtoad.pl

Leave a Comment

SMTP Challenge – Web 6 (Medium): National Cyber League (NCL) 2015 Post-Season

For a total of 300-points and using Node.js; this challenge required submitting a line-by-line solution via telnet or [ netcat / ncat / nc ].

The difficulty in this challenge came form having to craft the email in a very particular way which the server was expecting. For example: used the wrong syntax[1], improper use of case in the command(s) or spacing. Simply put, without the proper solution – the flag would not display.

Kudos to all who conqueror this challenge!

Question:

  • Connect to the smtp server at sb1.cyberskyline.com:3060 and send an email to daniel@hacker.test from the address, user4928@hacker.test, with a title saying you have the latest exploit and he will open it, allowing you to unlock the flag.
  • This SMTP server does not follow protocol exactly, but close enough.
  • What is the flag you receive from sending the spoofed email?

Code:

HELO HACKER.TEST
MAIL FROM:<user4928@hacker.test>
RCPT TO:<daniel@hacker.test>
DATA
From: "user4928" <user4928@hacker.test>
To: "daniel" <daniel@hacker.test>
Subject: you have the latest exploit
.
QUIT

Answer/Solution:

Telnet:

$ telnet sb1.cyberskyline.com 3060
Trying 104.236.16.36...
Connected to sb1.cyberskyline.com.
Escape character is '^]'.
220 sb1.cyberskyline.com ESMTP CyberSkyline
HELO HACKER.TEST
250 Hello HACKER, sb1.cyberskyline.com at your service
MAIL FROM:<user4928@hacker.test>
250 OK Sounds good, I like this idea
RCPT TO:<daniel@hacker.test>
250 OK Seems like a good person to write a note to
DATA
354 Go ahead, send all the cyber big data
From: "user4928" <user4928@hacker.test>
To: "daniel" <daniel@hacker.test>
Subject: you have the latest exploit
.
250 Ok: I will try my best to send this, I'm the little server that could
QUIT
221 Don't leave... I'm just a sad lonely server... closing connection.
Your flag is NCL-SAAS-3564 Thank you for playing
Connection closed by foreign host.

Netcat:

$ ncat sb1.cyberskyline.com 3060
220 sb1.cyberskyline.com ESMTP CyberSkyline
HELO HACKER.TEST
250 Hello HACKER, sb1.cyberskyline.com at your service
MAIL FROM:<user4928@hacker.test>
250 OK Sounds good, I like this idea
RCPT TO:<daniel@hacker.test>
250 OK Seems like a good person to write a note to
DATA
354 Go ahead, send all the cyber big data
From: "user4928" <user4928@hacker.test>
To: "daniel" <daniel@hacker.test>
Subject: you have the latest exploit
.
250 Ok: I will try my best to send this, I'm the little server that could
QUIT
221 Don't leave... I'm just a sad lonely server... closing connection.
Your flag is NCL-SAAS-3564 Thank you for playing

Reference:
[1] https://en.wikipedia.org/wiki/Simple_Mail_Transfer_Protocol#SMTP_transport_example

Leave a Comment

2014 NCL National Championship Challenge

By Glenn Murphy

Although the challenges in the NCL competition became progressively more difficult with each round, the Post-Season games at least gave the benefit of time—eight days instead of four hours. That provided the opportunity to spend many hours searching online and learning in an attempt to capture more flags. Below is a description of how one member of CLC’s Gold Bracket “CLC Team 6” approached some of the challenges in the areas of Password Cracking, Wireless Exploitation, Scanning and Reconnaissance, and Enumeration and Exploitation.

Password Cracking

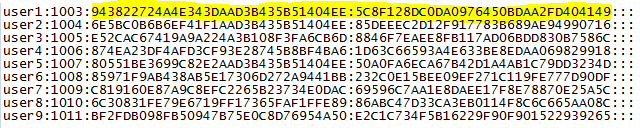
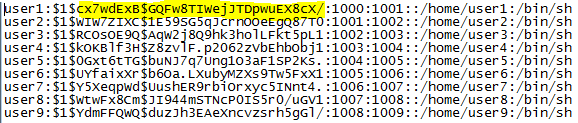
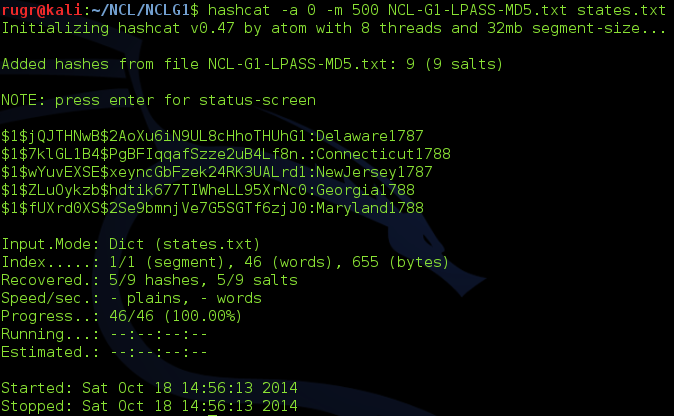
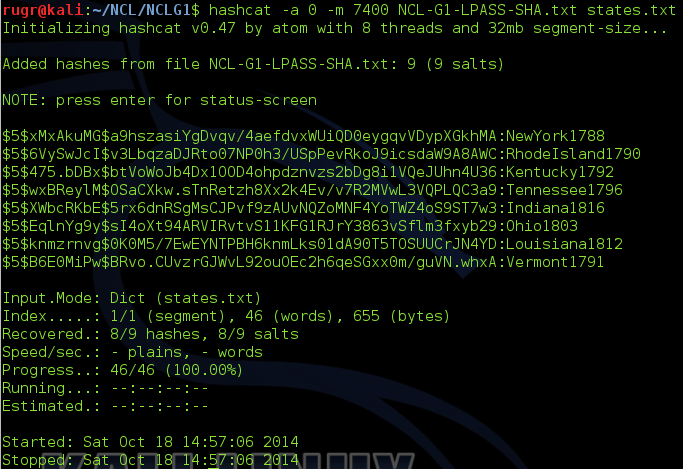
Even though my efforts on the Password 1 challenge only duplicated the efforts of other members of the team, I still feel it was worth the time for the experience I gained. For this challenge an HTML file is provided which purports to be a solicitation to crack a password database in return for bitcoins. The “client” provides several plain text passwords, the password file containing usernames and hashed passwords, and nearly complete code for implementing the hashing algorithm (shown below).

NCLmurphy1

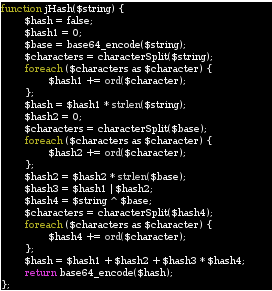
Due to the fact that it has been many years since I have done any kind of programming, my first order of business was to figure out what language this is written in. A Google search for strlen, ord, and base64_encode returned many pages of documentation for PHP, a language in which I have never written a single line of code, so the first order of business was to see if I could quickly learn enough about PHP to implement the missing characterSplit function. This turned out to be quite easy, as I quickly found that PHP already has a str_split function that performs the necessary function of loading the individual characters of a string into an array, and this function could simply be used to replace all references to characterSplit in the provided code. Next up was finding a way to run the code without implementing it on a web server. Thankfully Linux has a command line PHP interpreter, so I placed the code in a simple shell script that replaced the initial jHash function call with a line of code that takes a command line argument and loads it into a string variable used by the remaining code. The resulting code was as follows:

#!/usr/bin/php

<?php

$string=$argv[1];

$hash = false;

$hash1 = 0;

$base = base64_encode($string);

$characters = str_split($string);

foreach ($characters as $character) {

$hash1 += ord($character);

};

$hash = $hash1 * strlen($string);

$hash2 = 0;

$characters = str_split($base);

foreach ($characters as $character) {

$hash2 += ord($character);

};

$hash2 = $hash2 * strlen($base);

$hash3 = $hash1 | $hash2;

$hash4 = $string ^ $base;

$characters = str_split($hash4);

foreach ($characters as $character) {

$hash4 += ord($character);

};

$hash = $hash1 + $hash2 + $hash3 * $hash4;

echo base64_encode($hash);

?>

It was time for a test to see if the code was working, so I fed the script the first provided password, “Darnassus”, and checked to see if the resulting hash matched any of the hashes in the provided password file.

NCLmurphy2

The lack of a newline made for rather ugly output, but the test was successful—the hash matches the first line in the password file for user “test”. Now it was time to find potential passwords to hash, and find a way to feed a file to the script instead of running once per password. I played World of Warcraft once upon a time, and immediately recognized that the three provided passwords were all names of cities in the game, although someone unfamiliar with the game could have Googled Darnassus, Ratchet, and Area 52 and quickly found a wiki page listing city names for eight of the passwords. For this reason I initially concentrated on making lists of cities, towns, islands, etc. from the game. The solution I came up with was somewhat ugly, and still required some manual cleaning of the data. My procedure was to look at the source of pages from the www.wowwiki.com web site containing lists of the type of data containing potential passwords. The html containing the list of items (e.g. boss characters) was copied into a text file, then the HTML tags were stripped out using sed as in the following example:

cat bosses4 | sed 's|<[^>]*>||g' >> bosses

Here the fourth page of a large list of bosses was stripped of HTML tags and appended to a single text file listing one boss name per line. The file was then opened in gedit to remove any extraneous characters (many longer lists would contain letters of the alphabet dividing the list, and these would end up at the end of a name after the tags were removed). Once a list was created, it could be fed to the hashing script using another short script (which probably could have been combined into one script).

#!bash
while read line; do
./custom-hash "$line";echo $line 
done < /root/G3/bosses

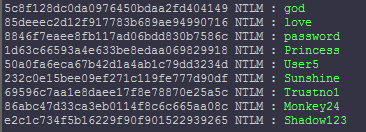
This script could then be piped to grep to see if any hashes matched those from the provided file. This technique allowed me to find the passwords my teammates had already found, but four passwords had still not been found. I did not put any more effort into building password lists at that point since I learned that one of my more knowledgeable teammates was working on a way to scrape the entire WoWwiki site, so I decided to spend the remaining hours of the competition working on other challenges.

Wireless Exploitation

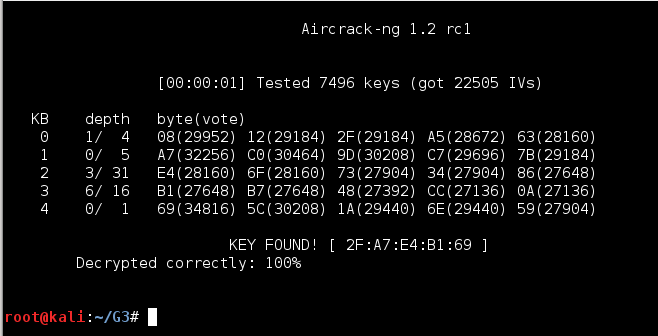
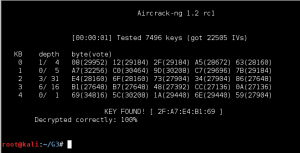
As in the previous rounds, the NCL Post-season had four Wireless Enumeration challenges of increasing difficulty. As it would not be possible to try to exploit a live wifi network as part of the competition, a .cap file is provided for each challenge containing authentication packets among the other data, and therefore making it possible to decrypt once the password was cracked. The first two challenges were WEP “protected” networks with a large number initialization vectors in the .cap files, so obtaining the passwords was trivial using aircrack-ng. Wireless-1 had a 40-bit key, and Wireless-2 had a 128-bit key.

NCLmurphy3

NCLmurphy4

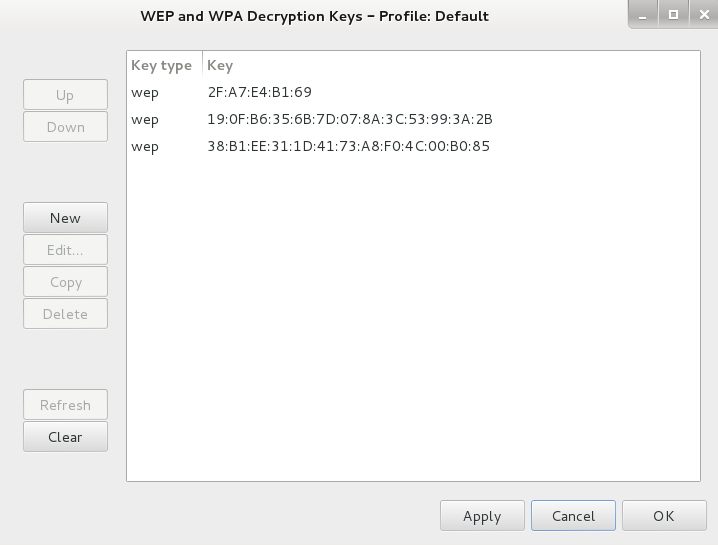
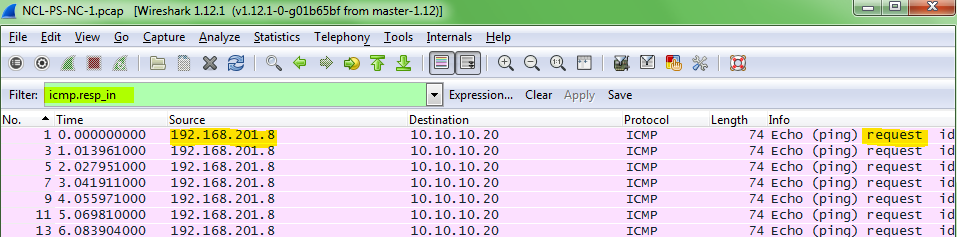
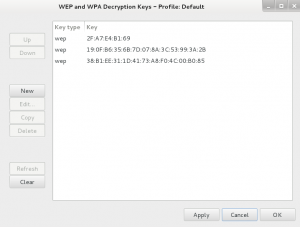
Once the key was found, it could be entered into the IEEE 802.11 preferences in Wireshark in order to decrypt the .cap file and start looking for the remaining flags.

NCLmurphy5

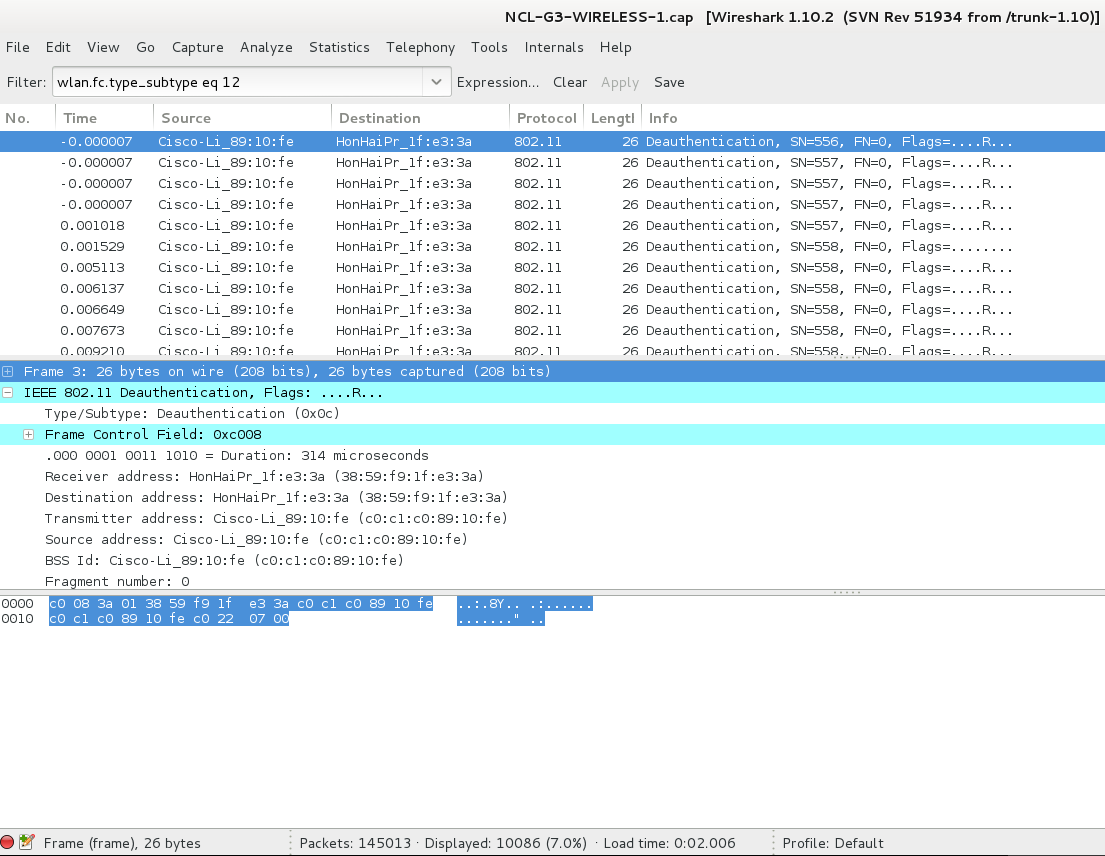
Many of the NCL Wireless Access Exploitation challenges ask for the MAC address of a packet injector and the victim client. I did many, many internet searches in an attempt to figure out how to interpret a .cap file to find this information, but came up empty every time. There are numerous tutorials on how to perform packet injection to exploit an access point, but even when I tried to use search terms geared more towards forensics and security topics, I could not find any information on how to identify and analyze a packet injection attack from network data. I could sometimes make an educated guess by filtering for deauth packets in Wireshark, but every .cap file was different, and this did not always help.

NCLmurphy6

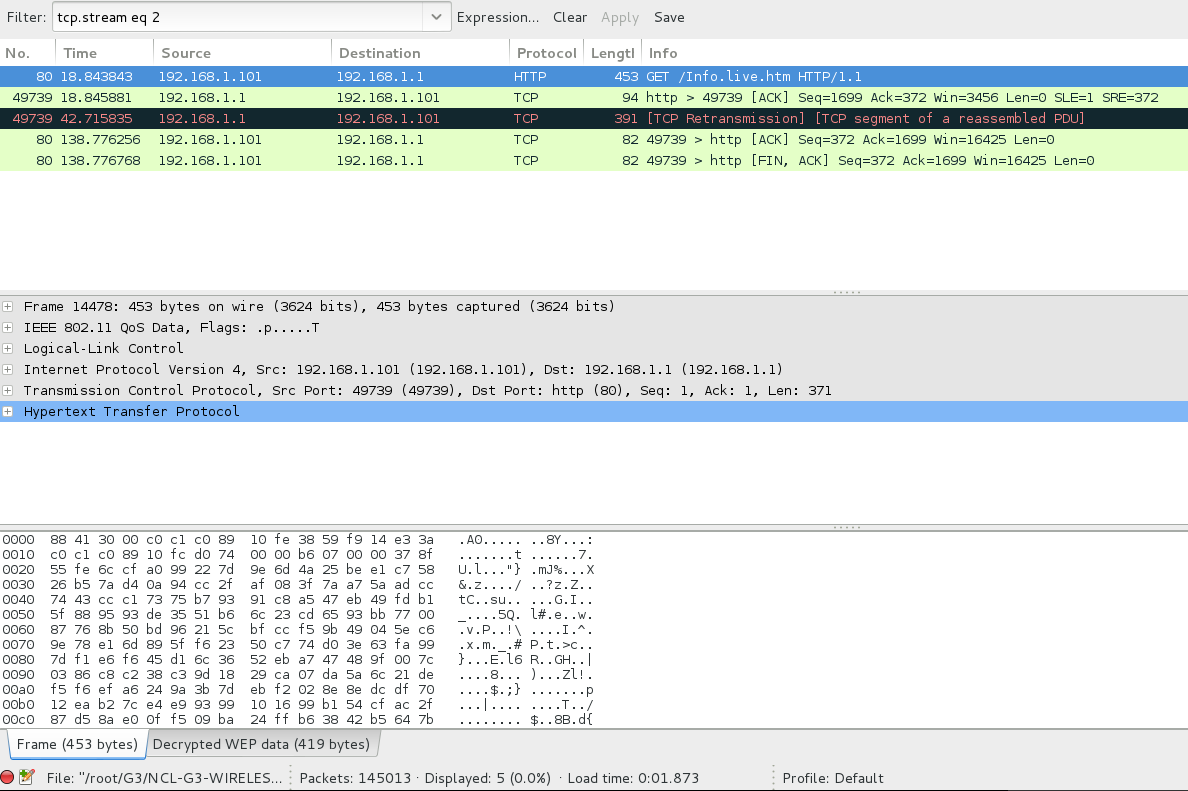
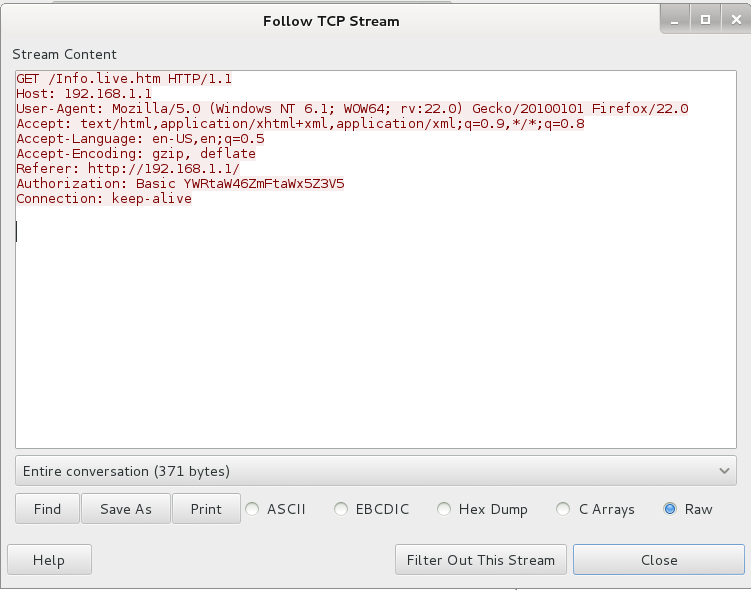
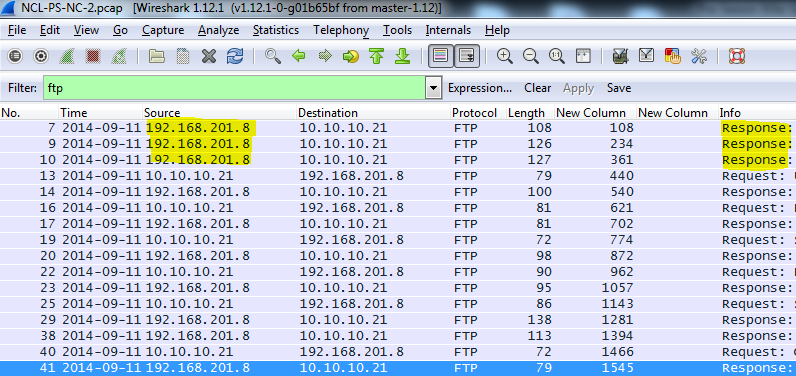
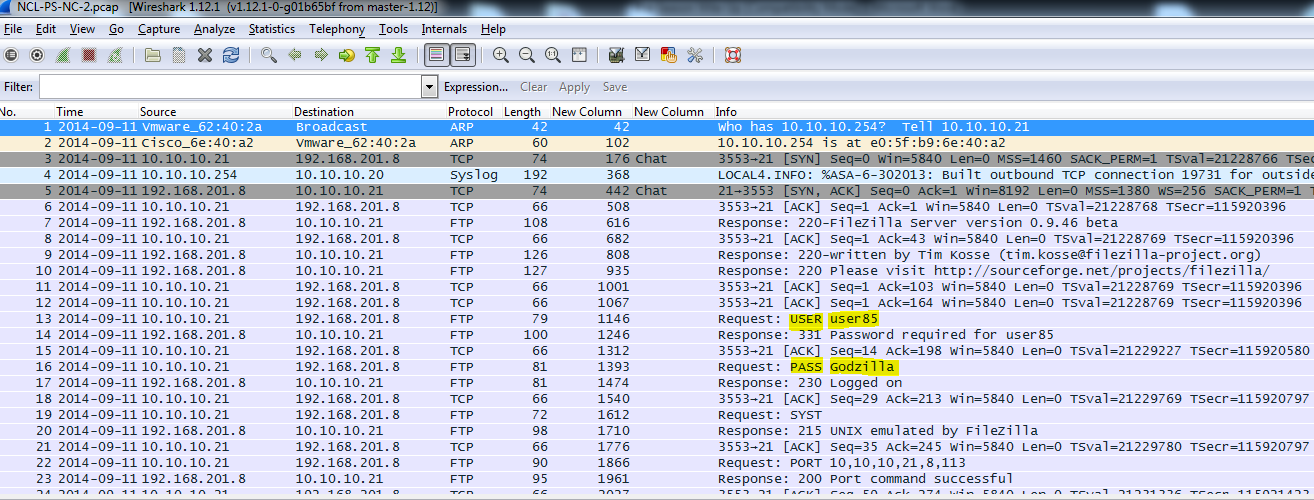
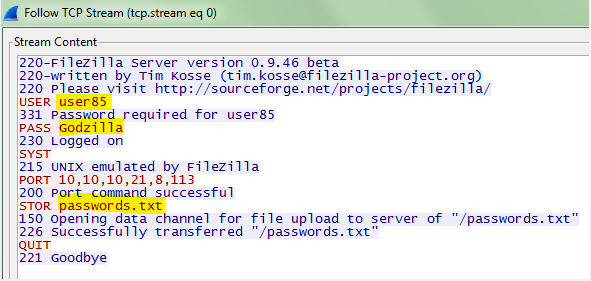
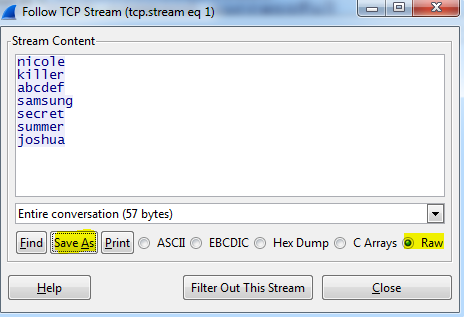
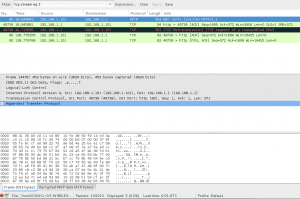
Each Wireless Access Exploitation had one flag that was fairly easy to capture once the password was cracked—the Wireless Administration interface password. The .cap files all conveniently contain HTTP traffic to the wifi access point’s web interface. For smaller .cap files it can be possible to simply filter for HTTP traffic and inspect the resulting packets for GET commands. For larger files with more HTTP traffic it is helpful to further filter by destination IP after determining the IP of the wireless access point. In the case of NCL-G3-WIRELESS-1.cap, the IP address was 192.168.1.1.

NCLmurphy7

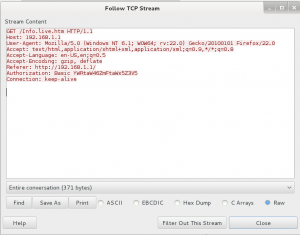
Following the TCP stream reveals a base64 encoded basic authorization which can easily be converted to plain text using the base64 command.

NCLmurphy8

NCLmurphy9

The base64 command is intended to take its input from a file, so as can be seen above, giving it encoded data from the command line is a bit awkward. Another option is to simply put the encoded base64 data in a text file, then the command syntax is simply

base64 -d <filename>

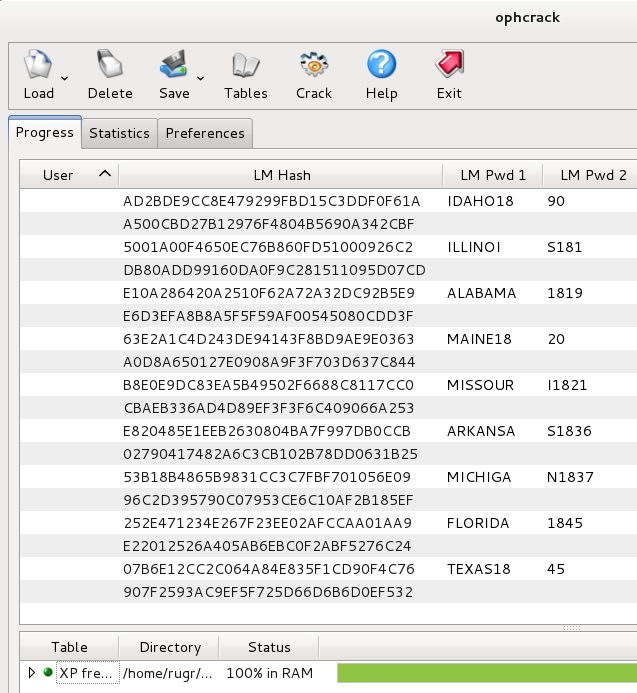
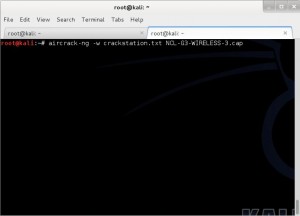
The Wireless-3 and Wireless-4 challenges for all rounds of the NCL competition used WPA encryption, with the difficulty steadily increasing with each round. Wireless-3 in each case was susceptible to dictionary attacks, but needed larger dictionaries for each round. The darkc0de.lst file distributed with many cracking programs was OK to start, but it was necessary to move up to rockyou.txt for Round 2, and although I started it too late in week to find the key before the competition ended (the key was found approximately 3 hours after the deadline), the massive crackstation.txt dictionary contained the password for the Post-season Wireless-3 challenge.

NCLmurphy10

NCLmurphy11

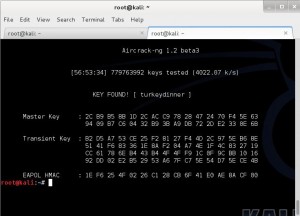
As you can see from the screen capture, it took my virtual machine just under 57 hours to check nearly 780 million passwords. This virtual machine was a 64-bit Kali installation using 6 cores of a AMD FX-8120 processor, so it was not exactly the best setup for doing password cracking. AMD’s FX processors have a modular design where each module has two cores with independent integer units, but the two cores share a floating point unit (see http://en.wikipedia.org/wiki/Bulldozer_%28microarchitecture%29#Bulldozer_core). AMD’s intention was that machines using FX processors would also use AMD GPUs, which could be used to pick up some of the heavy floating point workloads. Unfortunately, the VM I used was running on a ESXi host that is not configured for direct access to hardware such as the graphics card, and the graphics card is an old, under-powered model used only for console access during installation of the OS.

Before deciding I had nothing to lose by letting the VM run aircrack-ng for days, I had made an attempt to set up a physical machine to use a GPU. An external USB3 dock was used with an old hard drive to run Linux on what is usually a Windows 8 computer. The machine in question has a AMD FX-6300 six-core processor and a AMD Radeon HD 7700 GPU. This is not a high-end GPU, but benchmarks I saw on various websites indicated that it should be able to do roughly 90,000 WPA keys/second. Unfortunately, it can be quite tricky to get this set up properly in Linux. In order to enable the use of GPU processing by tools like aircrack-ng or oclhashcat it is necessary to use proprietary drivers. These drivers can conflict with the open-source drivers if not properly installed, and are very finicky about kernel and library versions. The best performance I managed to obtain was about 12,000 keys/second. Although this was a three-fold improvement over the VM’s performance, it was only a fraction of the performance the GPU should have been capable of. Since it was obvious that something was not right in my configuration, I chose not to run this setup for fear of damaging the GPU.

Another approach I attempted (unsuccessfully) to use for cracking the WPA passwords was to use the crunch command to generate wordlists for aircrack-ng on the fly. It can take a while to learn crunch’s syntax, but it can be a very powerful tool if you want to try potential passwords with a particular pattern, and piping it directly to a cracking program eliminates the need to store the huge files crunch is capable of generating (for example, all combinations of 8 lowercase letters would produce a nearly 2TB text file). Earlier rounds of the NCL competition had passwords such as “pumpkinpie” and “pumpkinhead”, so I wanted to explore possible passwords starting with the word pumpkin. The following command uses crunch to generate 12-character passwords starting with pumpkin followed by five lower-case letters, and pipes them into aircrack-ng from stdin.

crunch 12 12 -t pumpkin@@@@@ | aircrack-ng --bssid c0:c1:c0:89:10:fe -w- NCL-G3-WIRELESS-3.cap

This took about an hour to run on my VM (checking 3 and 4 character combinations was very fast), but as can be seen above, I was looking for the wrong pattern. I had simply assumed that the pattern from previous rounds would continue, and it did not occur to me that having moved on from October to November the theme might change. I did not test this theory, but it might be possible in cases like this to build a smaller dictionary from crackstation.txt using grep to find passwords containing pumpkin, turkey, etc. Although the full crackstation file is 15GB, grep should be able to run through it looking for a word to create a smaller targeted dictionary relatively much faster than waiting for aircrack-ng to go through the entire dictionary sequentially.

Although my lack of success during the competition was a bit frustrating, I did learn a lot from my attempts to crack the password for NCL-G3-WIRELESS-3.cap. I try to console myself with the knowledge that even if I had cracked it a few hours sooner, the flags for this challenge were not worth enough points to move our team up any further in the standings.

Scanning and Reconnaissance

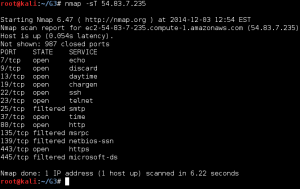
The NCL Scanning and Reconnaissance challenges generally have some low-hanging fruit simply asking for the first 1 through n TCP or UDP ports on the server at the given target IP. Most of the ports can be found using a simple default scan such as TCP scan for Recon 1 shown below.

NCLmurphy12

To find the higher point value open ports requires only a little more knowledge of nmap, such as realizing that it only scans the first 1000 common ports. Therefore, to find the remaining open port flags, it is usually only necessary to either specify a port range to scan or (if you are a little more patient) scan all ports.

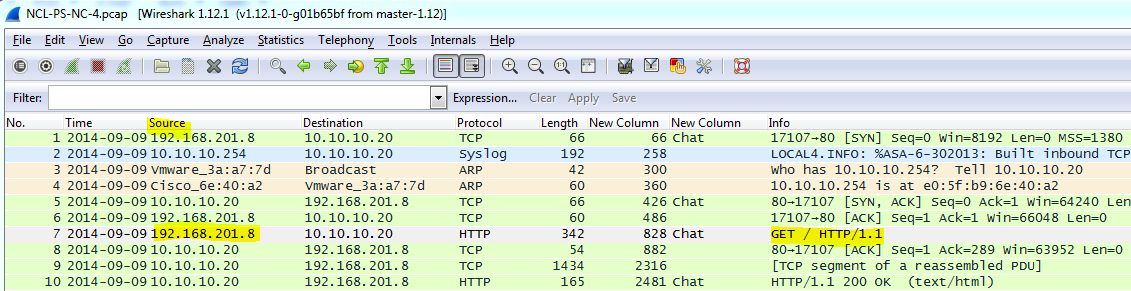
The Recon 2 flags for the post-season were somewhat more challenging. The first order of business is to find the port that has a HTTP 1.1 compliant web server running on it. As can be seen in the scan for ports 50-70 shown below, this target returns what appears to be random banners for every port. Depending on the type of scan, nmap will tell you that either all ports are open, all ports are closed, or all ports are filtered.

NCLmurphy13

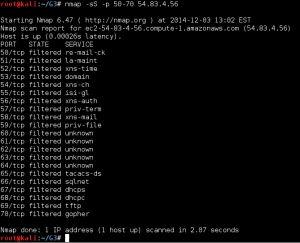
For a long time I assumed that this behavior was the response of an Intrusion Detection System responding to my scans, so I spent a lot of time playing with timing options and custom TCP flags in an attempt to get around this behavior. All I learned from this was that the standard ports for SSH, SMTP, and Samba did appear to actually be open. All scans and attempts to connect to these ports using telnet gave the same response every time. It finally occurred to me that I was approaching the problem all wrong. The key lesson was that open ports were giving the same response every time, and the remaining ports were likely to respond with a different banner each time they were scanned. So the solution was to do more than one scan of all ports, and then compare the scans for ports that did not change. So I did two scans of all ports, and had nmap output the results in all formats, because allthough I wasn’t sure how I was going to search through two sets of 65,535 ports, I knew I wasn’t going to do it with my eyeballs. The command I used to generate the first scan is shown below.

nmap -Pn -v -n -p- -sV 54.204.15.112 -oA recon2-all-ports-diff1

There are probably easy ways to use nmap’s XML output to analyze data, but I’m not familiar with them. What I do know is that if you want to manipulate text data using common command line tools, there is probably a solution to be found on http://stackoverflow.com. I knew there was a Unix tool called diff that will show you which lines of two files are different, but I was surprised to discover that there is no easy tool to use to show which lines match. It didn’t take long to find the following code from http://stackoverflow.com/questions/12246910/shell-find-matching-lines-across-many-files/19861397#19861397.

#!/bin/bash

ans="matching_lines"

for file1 in *

do

for file2 in *

do

if [ "$file1" != "$ans" ] && [ "$file2" != "$ans" ] && [ "$file1" != "$file2" ] ; then

echo "Comparing: $file1 $file2 ..." >> $ans

perl -ne 'print if ($seen{$_} .= @ARGV) =~ /10$/' $file1 $file2 >> $ans

fi

done

done

A quick test comparing .nmap files from two scans of the target showed that I had a problem. The format of the .nmap file is four columns separated by whitespace showing PORT, STATE, SERVICE, and VERSION. But the amount of whitespace can change from one scan to the next depending on the length of the data contained in the SERVICE column, causing some matches to be missed. This was easily remedied by using tr to reduce all whitespace to single spaces:

cat file.nmap | tr -s ' ' > newfile.nmap

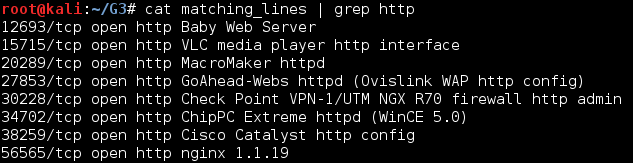
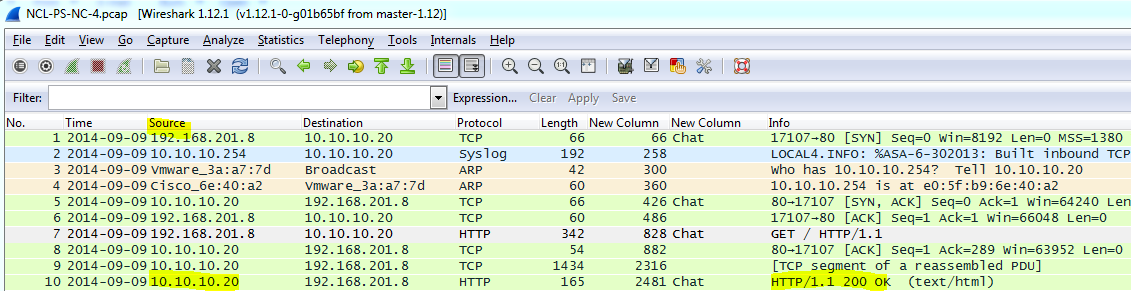
After the resulting files were run through the comparison script above, I was able to grep the resulting matching_lines file for “http”. This resulted in a very short list of ports to check:

NCLmurphy14

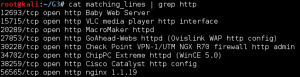
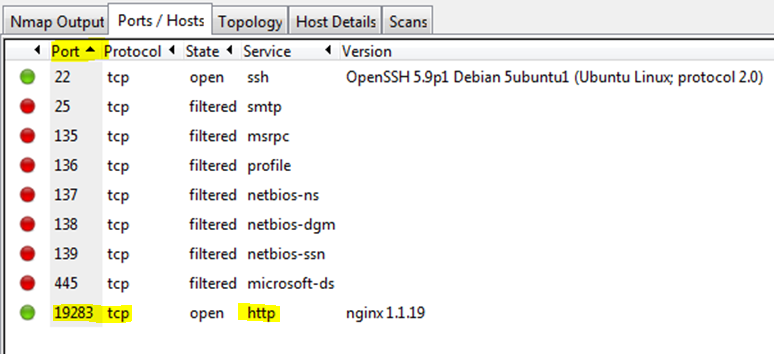
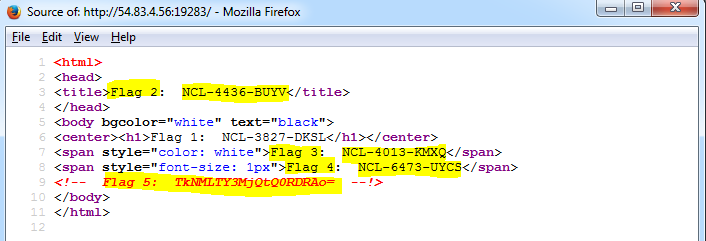
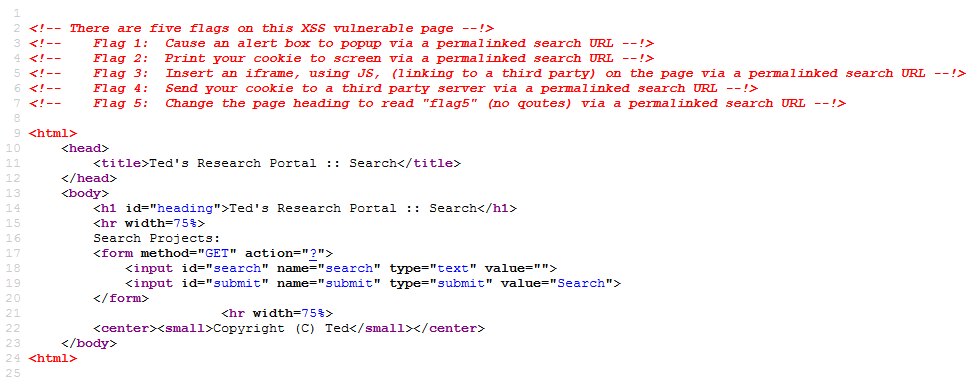
Port 56565 was indeed running nginx, and a quick look at the page source gave 5 easy flags:

<html>

<head>

<title>Flag 2: NCL-MORE-1337</title>

</head>

<body bgcolor="white" text="black">

<center><h1>Flag 1: NCL-KDLS-8682</h1></center>

<span style="color: white">Flag 3: NCL-6320-HCDL</span>

<span style="font-size: 1px">Flag 4: NCL-1639-UCLS</span>

<!-- Flag 5: TkNMLUNXTkItNzI0NAo= --!>

</body>

</html>

Flags 1 and 2 were in plain sight in the page and the browser title bar, flag 3 was hidden by making it white text on a white background, flag 4 was in unreadable 1pixel font, and flag 5 was base64 encoded in a comment. Although I did poke around a liitle more on this server, I never discovered where the sixth flag was hidden, and chose to spend the remaining time on other challenges.

Enumeration and Exploitation

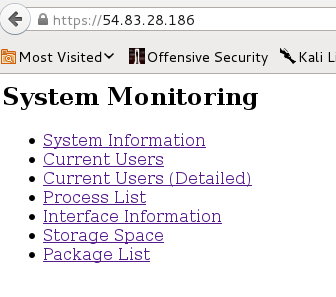
With time running out on Saturday night, CLC Team 6 was slowly falling in the standings, and I was becoming desperate to find something I could figure out for some more points. The last thing I looked at was Exploit 3, a web server with a simple page that uses links to display the output of some common commands using a CGI interface.

NCLmurphy15

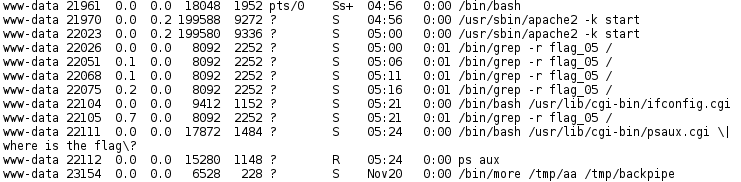
I spent fair amount of time trying to figure out if there was some way to get the output from command injection using the browser, and based on what I was seeing in the ps aux output, I wasn’t the only one. This approach was a dead-end, but did at least show me that the ps output was real as evidenced by my frustrated question displayed as PID 22111 in the output below.

NCLmurphy16

Although I did not find a way to find the flags on this target using a browser, I did get a lot of useful information from the process list. First of all, I noticed that in most cases, the next PID after a CGI process was /bin/bash -i, a call to an interactive shell. It was time to start reading up on how to exploit shellshock. The other piece of information gained was the path to the cgi-bin directory, which could be useful once an exploit was found.

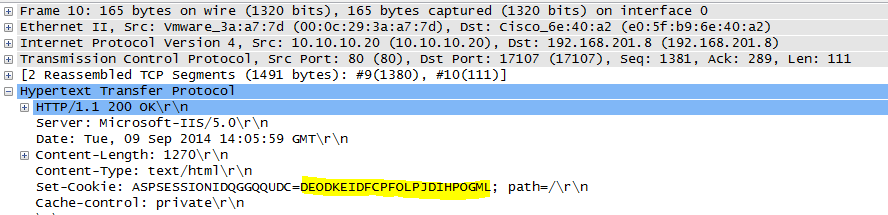
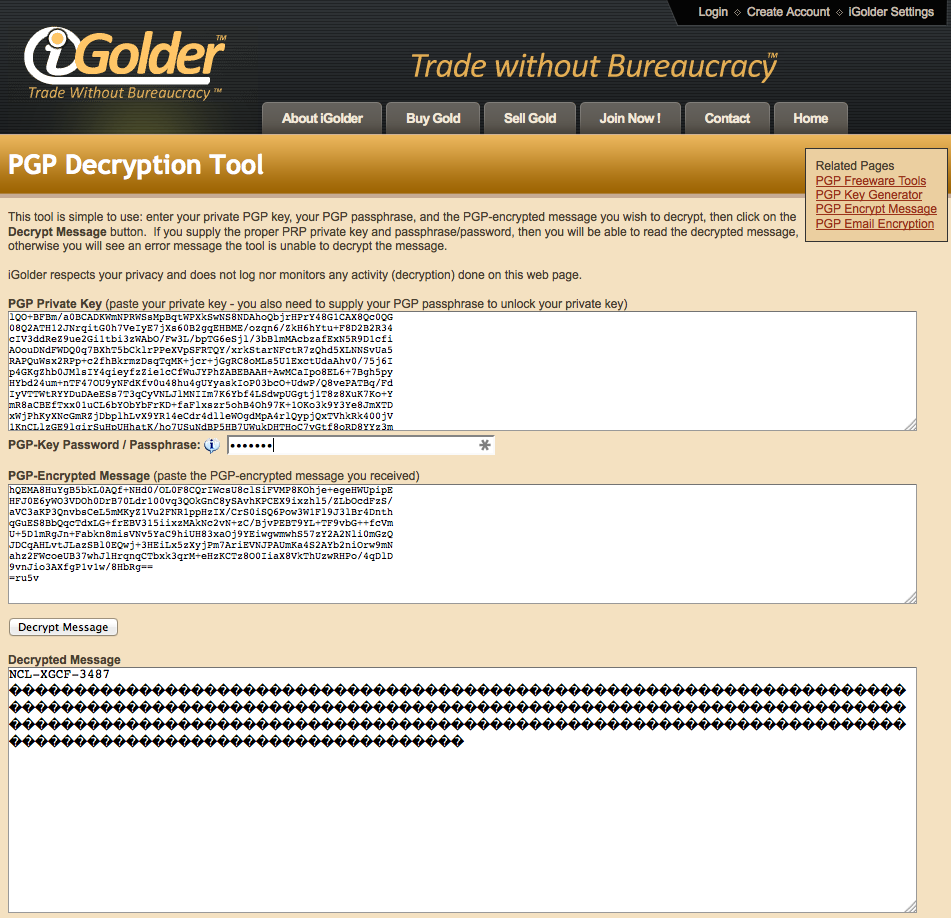
My metasploit installation was up to date, and included multiple exploits for the bash shellshock bug. However, after about half an hour of playing around with the options for them, I was unable to successfully connect to the target with a reverse shell payload. I was starting to wonder if I was on the right track, so I took a step back and started searching the web for various ways to remotely test if a server was susceptible to shellshock. Eventually my searches led me to a page (http://security.stackexchange.com/questions/68122/what-is-a-specific-example-of-how-the-shellshock-bash-bug-could-be-exploited) explaining how to use the wget command using the user agent string to send commands to a webserver with the command output dumped to the file the wget command is supposedly trying to download. This method could be used to list directories, then cat the contents of flag files once they were found as in the following example for flag 2:

wget --secure-protocol=auto --no-check-certificate -U "() { test;};echo \"Content-type: text/plain\"; echo; echo; /bin/cat /var/www/flag02.php" https://54.83.28.186/cgi-bin/psaux.cgi

which resulted in the following output:

NCLmurphy17

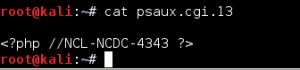
Unfortunately, I didn’t figure out this exploit until there were literally only minutes left in the competition, so I ran out of time before I could find all of the flags. Amusingly, I never found flag 1, although that was probably meant to be the easiest one. Once I figured out the exploit, I went straight to a listing of the root directory to get my bearings, and found flags 3 and 4 in text files there. I went back to the /var/www directory next and found flag 2 in a PHP file, but then the clock hit 11PM and the contest was over. Fortunately, the flags I did get from this target gave enough points to raise the team from 11th to 8th in the standings almost literally at the last minute (my last flag capture was at 10:57PM).

Conclusion

Although I was often frustrated by my lack of knowledge, especially in web app exploitation, competing in the NCL competition was a very fun and educational experience overall. I often surprised myself with how much I could learn on the fly just using Google and some common sense. My biggest regret was the lack of planning for the Post Season team round. There was very little communication between team members (I was almost always the only student on the IRC channel), and a lot of duplicated efforts. We were a bunch of individuals with a combined score rather than a team. One member of the Gold team did not capture any flags, and I felt this should not have happened if we were actually working as a team. I still hope everyone got something out of it, and that what we learned can be used to improve the experience for future classes.

Leave a Comment

2014 NCL Pre-Season Write-Up

Password Cracking for Windows Passwords

Part one of the section asked what the password hashes were for specific users. To answer those, you simply had to copy the correct hash format and paste it into the flag entry dialog box.

Part two of the section asked what the plaintext passwords were for specific users. In order to get the passwords, you had to decrypt the NTLM hashes. I found that the quickest way to decrypt the NTLM hashes was to use the online tool provided by http://www.hashkiller.co.uk/ntlm-decrypter.aspx.

Password Cracking for Linux Passwords

Part one of the section asked what the password hashes were for specific users. I used the same method as with the Windows passwords, copy and pasting the hash into the flag entry dialog box.

Part two of the section asked what the plaintext passwords were for specific users. In order to get the passwords, you had to decrypt the MD5 hashes. I found that the quickest way to decrypt the MD5 hashes was to use John the Ripper.

Part three of the section asked what the password hashes were for each specific user and this time the encryption method used was SHA-256. In order to determine the hash algorithm, you must look into how Linux stores passwords. $5$ indicates that the SHA-256 algorithm was used to hash the passwords. Knowing which hash algorithm was used may be required depending on which tool you are going to use to crack them.

Below is a guide for future reference.

$1$= MD5

$2$=Blowfish

$2a=eksblowfish

$5$=SHA-256

$6$=SHA-512

The flags for this section were captured by copying and pasting the hashes into the flag submission dialog box.

Part four of the section asked what the plaintext passwords were for specific users. In order to get the passwords, you had to decrypt the SHA-256 salted hashes. Again, I used John the Ripper. Note in the screenshot below that John the Ripper was able to detect the SHA-256 hash algorithm.

John the Ripper was unable to decrypt user5 and after several additional tries, I moved on.

Network Traffic Analysis

I used Wireshark to analyze the four PCAP files provided for this portion of the challenge. If you have used Wireshark before, the majority of the questions are fairly straight forward. When I first began using Wireshark, I found the best way to learn was by capturing my own network traffic and analyzing it.

Network Capture 1 – Questions and Answers

Image1

In order to determine which IP address was sending ICMP requests, I applied a filter (icmp.resp_in) that would show me all ICMP requests. From there it was a matter of singling out the source IP (192.168.201.8) and pasting it into the flag dialog box.

Image2

Image3

To find the IP address of the system replying to the ICMP requests you can look at the destination of the ICMP request (10.10.10.20).

Image4

Image5

Using the same filter (icmp.resp_in) that was used to see all of the ICMP requests, you can look at the bottom of the window pane to see how many requests are being displayed by the filter, in this case there were 19 ICMP requests being displayed.

Image6

Image7

To see how many ICMP responses were in the capture, you can add “not” to the beginning of the previously used filter (not icmp.resp_in). Again, looking to the bottom of the window pane, you can see that there were 19 ICMP responses.

Image8

Network Capture 2 – Questions and Answers

Image9

In order to find the IP address of the FTP user, I applied the “ftp” filter to eliminate all non-FTP traffic. Once the filter was applied, it was a matter of identifying the source IP address (10.10.10.20) of the FTP request.

Image10

image11

To find the IP address of the FTP server, you need to identify the source IP address (192.168.201.8) of the FTP response.

Image12

image13

To find the Default Gateway to the FTP user, you can use the “ARP” filter. This may not always be the easiest way; however, because there was only one broadcast and one reply in the capture, it turned out to be straight forward.

image14

image15

image16

Finding the username and password can be completed by looking at the information in the Info column.

image17

Additionally, the entire conversation can be viewed by right clicking on one the ACKs and following the TCP stream.

image18

image19

You can see using the screenshot above that the name of the uploaded file was passwords.txt

image20

To view the contents of the uploaded file you need to find the packets that contain FTP-DATA in the Protocol column, right click on one of them and Follow the TCP Stream.

image21

A dialog box will open containing the contents of the file. You should use the “Save as” option to export the data out and use a MD5 generator such as “Hash my Files” to get the needed MD5.

image22

The MD5 for the exported text was: B0B625BD4997A9C43258FC9C320FD24D

Network Capture 3 – Questions and Answers

The questions in this section were self-explanatory; however, I listed screen shots of the answers for those that may have not seen questions like them before.

image23

image24

image25

image26

image27

image28

image29

image30

image31

image32

image33

image34

image35

image36

image37

image38

image39

image40

Network Capture 4 – Questions and Answers

image41

image42

image43

image44

image45

image46

image47

image48

Scanning and Reconnaissance

Recon 1 – Questions and Answers

For this section you were provided with an IP address and asked to determine which TCP and UDP ports were open. The questions were phrased as follows:

image1

The TCP portion had several questions like the one above and could be answered by using a scanning tool, such as NMAP. I used Zenmap, which is a GUI version of NMAP on this portion of the challenge.

Using Zenmap, I ran an Intense scan, all TCP port which generates the following Nmap Command:

nmap -p 1-65535 -T4 -A -v 54.83.4.56

All the questions could be answered by looking at the port numbers in numerical order.

The UDP portion contained the same questions, but instead asked for the UDP port numbers.

Using Zenmap, I ran an Instense can plus UDP which generates the following Nmap command:

nmap -sS -sU -T4 -A -v 54.83.4.56

Recon 2 – Questions and Answers

For this section, an IP address was provided and scanned using Zenmap.

image2

The Zenmap scan revealed one open http port (19283).

image3

Entering the IP address and specifying the port number revealed the first flag.

image4

image5

Viewing the source of the webpage revealed Flag 2, 3, 4 and an encoded value for Flag 5.

image6

To determine what Flag 5 was, the encoded texted was plugged into an online base64 decoder. Flag 5 was revealed.

Image7

Open Source Intelligence

For this section it is important to remember what the topic is.

The target IP address provided leads to a webpage containing a cross-site scripting vulnerability.

image1

If you view the Page Source you will find the following hints:

image2

Googling one of the flag hints will lead you to the document containing the answers.

“Flag 1: Cause an alert box to popup via a permalinked search URL –!>”

I must admit that this section only came easy because the exact same challenge, containing the same flags were explained in the publicly released NCL 2012 Challenge Explanations, which I had read prior to the start of the pre-season.

The second portion involved the same steps as above with a new target IP

image3

image4

Web Application Exploitation

Web 1

For this challenge, you were given an IP address, which led you to the following page:

As you can see there is a cost involved in order to reveal the flag and you do not have enough coins to get them all.

To reveal the flags for this section, I used the Inspect Element feature on the page and deleted the node highlighted in yellow below, for each flag. Instead of deleting the entire node, the value could also be changed.

100 coins node

Web 2

This section contains the same concept as the previous section.

Deleting “Hidden” from the ‘type’ field modified the page so that a form became available.

Entering a negative value in the form field resulted in adding coins to the balance.

-2000 coins

Adding -2000 into the form resulted in adding ten times that amount into the coin balance.

 20010 Coins

Leave a Comment

2014 NCL (NATIONAL CYBER LEAGUE) Fall Season Competition Highlights

Pre-Season – Web 1

https://50.17.253.154/

This website allows players to “buy” flags. The player is given 100 coins, but only the first two flags can be purchased for 100 or less. What to do… Using a Firefox (Iceweasel) add-on called Tamper Data, I was able to modify the data being sent to the server before it left the browser.  The post parameters are the flag value, the cost and the submit value.

NCL-PS-Web1-1

Changing the flag value to 5 and the cost to 1 and submitting yields the following (if you want to go black hat, change the cost to a negative number and make them pay you for the flag!):

NCL-PS-Web1-2

From here, it’s just a matter of changing the flag values and grabbing the flags:

  • Flag 5: Purcahse Complete! Your Flag Is: NCL-CDEW-0922
  • Flag 4: Purcahse Complete! Your Flag Is: NCL-BRSA-2083
  • Flag 3: Purcahse Complete! Your Flag Is: NCL-AVBY-5907
  • Flag 2: Purcahse Complete! Your Flag Is: NCL-MOWX-8903
  • Flag 1: Purcahse Complete! Your Flag Is: NCL-TXSQ-7436

Pre-Season – Web 2

https://107.20.220.67/

This is pretty much a variation on Web 1.  Again, using Tamper Data and looking at the data being sent to the server, we can view the contents of the cookie:

PHPSESSID=2eq43ie2v0a99ah19q02apo2l4; balance=10

NCL-PS-Web2

If this one isn’t obvious to you at this point, you should be worried.  Add some zeros to the end of the cookie before submitting the data and purchase flags!

  • Flag 1: Purcahse Complete! Your Flag Is: NCL-NBCE-1694
  • Flag 2: Purcahse Complete! Your Flag Is: NCL-CNDE-2783
  • Flag 3: Purcahse Complete! Your Flag Is: NCL-KVFF-3872
  • Flag 4: Purcahse Complete! Your Flag Is: NCL-BQWZ-4961
  • Flag 5: Purcahse Complete! Your Flag Is: NCL-NUCY-5050

Flag 6 is a little tricky: the flag post parameter has to be changed to 6 (same as Web 1).  Sure enough, out pops a flag:

Flag 6: Purcahse Complete! Your Flag Is: NCL-YJQB-7784

* A hint to future competitors: they consistently misspelled “purchase” during these events.  Miss spelled words might be useful for dorking around Google in the future.

Regular Season Game #1 – Windows Passwords

https://54.83.60.127/NCL-G1-WPASS.txt

The first set of flags were simply the password hashes for users. The file contains Windows NTLM hashes. Submitting the following values scored me the first few flags:

user 1:
AD2BDE9CC8E479299FBD15C3DDF0F61A:A500CBD27B12976F4804B5690A342CBF

user 2:
5001A00F4650EC76B860FD51000926C2:DB80ADD99160DA0F9C281511095D07CD

user 3:
E10A286420A2510F62A72A32DC92B5E9:E6D3EFA8B8A5F5F59AF00545080CDD3F

user 4:
63E2A1C4D243DE94143F8BD9AE9E0363:A0D8A650127E0908A9F3F703D637C844

user 5:
B8E0E9DC83EA5B49502F6688C8117CC0:CBAEB336AD4D89EF3F3F6C409066A253

user 6:
E820485E1EEB2630804BA7F997DB0CCB:02790417482A6C3CB102B78DD0631B25

user 7:
53B18B4865B9831CC3C7FBF701056E09:96C2D395790C07953CE6C10AF2B185EF

user 8:
252E471234E267F23EE02AFCCAA01AA9:E22012526A405AB6EBC0F2ABF5276C24

user 9:
07B6E12CC2C064A84E835F1CD90F4C76:907F2593AC9EF5F725D66D6B6D0EF532

The next set of questions asks for the plaintext passwords for each user. I fired up Ophcrack and loaded one of their tables (XP free fast) along with the password dump. I got the following results:

Ophcrack-NCL-G1

Combining LM Pwd 1 with LM Pwd 2 allowed me to capture the rest of the flags for the Windows password cracking section.

A nice overview of NTLM vulns:
http://www.windowsecurity.com/articles-tutorials/authentication_and_encryption/How-Cracked-Windows-Password-Part1.html

Regular Season Game #1 – Linux (MD5) Passwords

https://54.83.60.127/NCL-G1-LPASS-MD5.txt

Like the Windows passwords, the first set of questions asks for the MD5 hashes in the password dump. The beginning of MD5 hashes can be identified by $1$. Each hash has 34 characters, 31 without the $1$. Here are the flag values:

user 1:
jQJTHNwB$2AoXu6iN9UL8cHhoTHUhG1

user 2:
NrPAaXgR$dHvfNH4x59H0.JAvFKcGs.

user 3:
wYuvEXSE$xeyncGbFzek24RK3UALrd1

user 4:
ZLuOykzb$hdtik677TIWheLL95XrNc0

user 5:
7klGL1B4$PgBFIqqafSzze2uB4Lf8n.

user 6:
RnZU3Asb$JhQO4pIJJnLDQLhEhOyrR/

user 7:
fUXrd0XS$2Se9bmnjVe7G5SGTf6zjJ0

user 8:
i1ykQed/$9NrT6ivuUZurBFwmrc2Om1

user 9:
btINzqfg$2nG3KGsydv8Q8ALuyAqdl1

The second set of questions again asks for plain text passwords. I compiled a list of states with the years they joined the Union. I then ran that list through hashcat and nabbed a few points:

hashcatMD5-NCL-G1

I tried playing with the cases and removing the last number (see Illinois above), I was unable to get any more of the passwords.

Regular Season Game #1 – Linux (SHA) Passwords

https://54.83.60.127/NCL-G1-LPASS-SHA.txt

Rinse, repeat. SHA passwords are often either 256-bit or 512-bit, being identified with a $5$ or a $6$ correspondingly. A SHA-256 hash is 55 characters and a SHA-512 hash is 98 characters. To save space/time, you can see the hashes from the dump and the results I was able to find through hashcat. Easy points.

hashcatSHA-NCL-G1

This turned out to be a useful site when I was trying to identify hashes:
http://www.breakthesecurity.com/2011/08/different-types-of-hash-codes-how-to.html

Regular Season Game #1 – Network Capture 1

https://54.83.60.127/NCL-G1-NC-1.pcap

I didn’t make it very far with this challenge. I found that the protocol being scanned was SNMP by opening Wireshark and looking at the statistics for number of packets sent by protocol. From there I was able to determine the origin and destination IPs: 192.168.201.128 and 192.168.201.1.

Regular Season Game #1 – OSINT 3

https://107.21.102.190

This flag was odd. I don’t think more than a handful of people would have been able to figure this one out without help – they certainly wouldn’t have had time. The most efficient way to find this flag is to surf the web for the answer. It turns out, you can find it here:

http://www.nationalcyberleague.org/2012/Fall/2012_Challenge_Explanations.pdf

Just in case you’re extra lazy and don’t want to browse the link for the flag, I was able to use 1290c8ae9f867dde48f16044b9e18bc1 to score points. I noticed that the NCL staff reused quite a few questions from the graveyard, the pre-season game and even between the regular and post season games.

OSINT3-NCL-G1

Regular Season Game #1 – OSINT 6

https://54.83.60.127/NCL-G1-OSINT-6.tgz

After expanding this file, there are 6 files. Using the cat command on flag.1.asc, it shows a PGP header. Using cat on passphrase shows a value of IcedTea. I’d like to say I could give a lengthy explanation of how PGP is used to encrypt email and how to set up a client. But, I was pinched for time so rather than going through the trouble of setting up a client on my workstation, I found a website that would allow me to decrypt PGP messages: igolder.com

OSINT6-NCL-G1

After throwing some PGP-ness at it, I found all three flags:
Flag 1: NCL-JKOB-8972
Flag 2: NCL-XGCF-3487
Flag 3: NCL-NDSV-6482

Regular Season Game #1 – Web Application Exploitation

https://54.225.116.75

This one was pretty easy. I used Tamper Data again.  When submitting a user name of 1, here’s what data going to this website looks like:

WebExploit-NCL-G1-1

To get the flag, change a’s value to true and send the info. This is the result:

WebExploit-NCL-G1-2

Regular Season Game #1 – Web Application Exploitation

https://54.225.116.75/

The player is presented with a simple login form with user name and password field.  Viewing the source of the page shows javascript being called from another web address at https://54.83.60.127/.NCL-G1-WEB-3.js.  Here’s the javascript on that page:

var _0x6382=["\x51\x77\x65\x72\x74\x79\x37\x38\x39\x34\x33\x6E\x73\x66\x64\x21\x21","\x4E\x43\x4C\x2D\x34\x33\x36\x39\x2D\x4E\x49\x4E\x45","\x49\x6E\x76\x61\x6C\x69\x64\x20\x4B\x65\x79"];function getFlag(_0x17b7x2){if(_0x17b7x2==_0x6382[0]){alert(_0x6382[1]);} else {alert(_0x6382[2]);} ;} ;

The code has been obfuscated by replacing ascii characters with hex characters.  See http://defindit.com/ascii.html for a translation list.  I went to http://www.unphp.net/decode and threw the javascript into the decoder.  The result is:

<?  var _0x6382=["Qwerty78943nsfd!!","NCL-4369-NINE","Invalid Key"];function getFlag(_0x17b7x2){if(_0x17b7x2==_0x6382[0]){alert(_0x6382[1]);} else {alert(_0x6382[2]);} ;} ;  ?>

Inside the text is a flag!

Post Season – Crypto 3

https://54.83.60.127/NCL-G3-CRYPTO-3.txt

The questions:

  • What is the last name of the author of the decoded document?
  • What is the title of the decoded document?
  • What is the flag in the decoded document?

The info we can get from the text file:

  • It’s long: good for data sampling
  • It looks like a normal document with punctuation and spacing
  • There don’t seem to be any special characters or numbers in place of letters

That narrows the options. I tried a few cyphers like ROT13 and Atbash. I had success when I tried Rumkin’s letter-pair replacement solver: http://rumkin.com/tools/cipher/cryptogram.php

Here’s a screenshot of the result:

NCL-PostS-Crypto3-1

The decrypted text shows The Tragedie of Macbeth by William Shakespeare, July, 2000 [Etext #2264]. So, there are answers to the first two questions. The third flag can be found using find in any text editor or web browser. About a third of the way through the deciphered text, this shows up:

NCL-PostS-Crypto3-2

And there’s the last answer.


NCL Pre Season Zip File
NCL Game1 Zip File
NCL Game2 Zip File
NCL Post Season Zip File

Leave a Comment